The schedule shows all your jobs for the specified day. If an order has multiple lines where each line is considered a job, each job will show as a line on the schedule.
The below video is a quick overview of scheduling and dispatching. The documentation below the video goes into more detail abut each section and menu option.
The dispatcher will spend 75% of their time on this screen, so we spent a lot of time optimizing this screen so the dispatcher can see all aspects of scheduling either on the screen or within a click. It pulls together all the information needed to schedule into one place. For example, you can see the trucks and their status, who is driving each truck, the order line items, the number of trucks requested, and the trucks scheduled for each order line.

The behavior of the schedule will be driven by the “Validate Utilization” under “General Settings”. If validate utilization is enabled, you will not be able to overschedule your trucks.
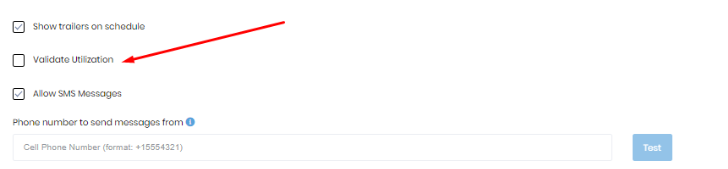
In the early years of the application, we recommended this setting be checked. However, we worked out a more forgiving method that can still give the same results with this disabled. We recommend that new customers leave this setting disabled. You will find the system easier to work with that way. The remaining instructions assume this setting is unchecked. You may see some slight differences from this documentation if you have it enabled.
Most people will see a header that looks like the below image without the numbers in red. If you have multiple offices configured, you will see an additional control to select the office.

The numbers below refer to the controls designated by the numbers in red circles in the image above.
The section shown below is the “Truck Block”. It displays your internal trucks, any lease haulers scheduled for the day, and a button to add additional trucks that weren’t entered in advance.

The format of the truck block is controlled by the toggle button in the top right corner of the screen. The view shown above is the compact view. If the toggle button “By Category” is clicked, the truck block will be divided into categories as shown below. Clicking on a category will open that segment so you can see the specified truck/trailer type.
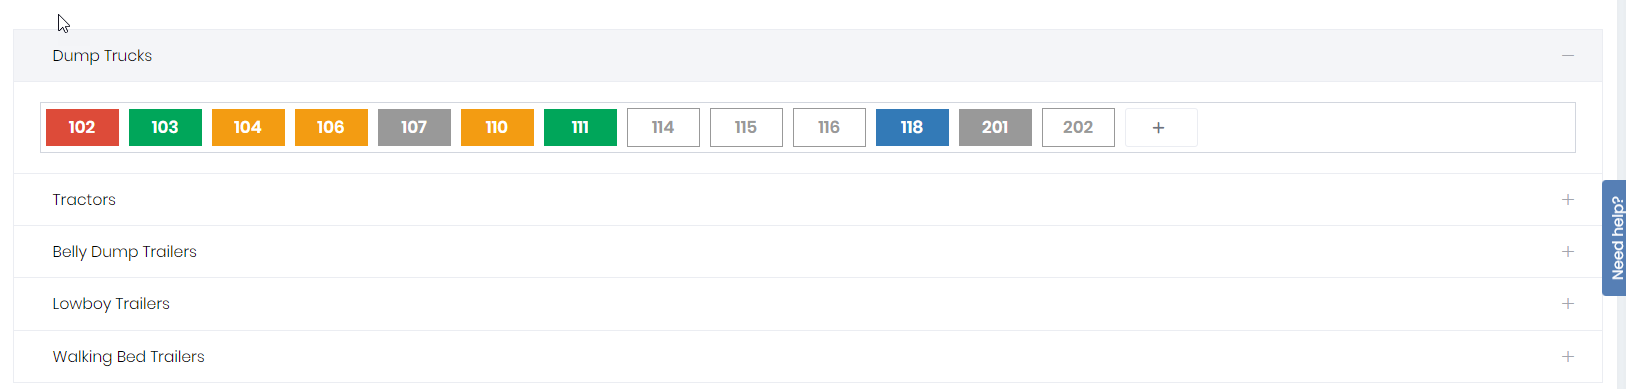
Each rectangle corresponds to a truck or trailer. Trailers will only be displayed if the “Show trailers on schedule” setting under the “Dispatching & Messaging” settings is true (checkbox checked).
The trucks and trailers are color coded. Following is what the colors mean:
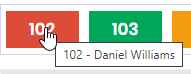
Hovering over a truck or trailer in the truck block will show more detail related to the truck. It currently shows the truck code and the driver, but very shortly will show the type of truck/trailer, information about the truck/trailer, and for trucks will show the trailer which is attached if it is coupled to a trailer.
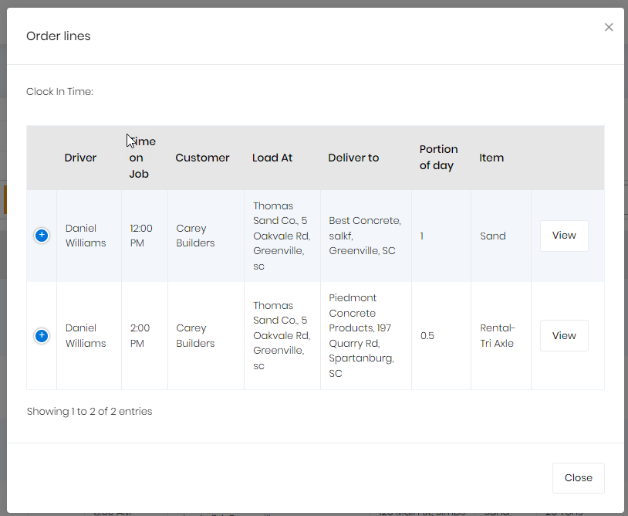
Clicking on a truck will show information related to the jobs the truck is assigned to for the day. Below is an example of what the dialog displays.
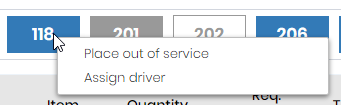
Right-clicking on a truck/trailer shows the menu options related to the actions you can perform for the truck.
These menu options are dynamic and change in response to the status of the truck/trailer. Below are two examples.
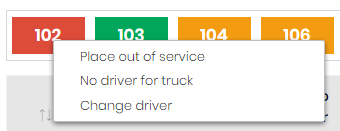
If your drivers have assigned trucks that they usually drive, you will want to set them as the default driver of the truck. Then when you create a new schedule, these drivers will default into the truck unless the driver is scheduled for the day off or if you have used the “Change Driver” menu option above to change the driver for the day. Note thet using the “Change Driver” option only changes the driver in the truck for the day of the schedule.
When specifying “No driver for truck”, you can choose a date range to remove the driver from the truck.
At the bottom of the “Schedule” screen is the actual schedule showing all the jobs and the trucks assigned to the jobs.
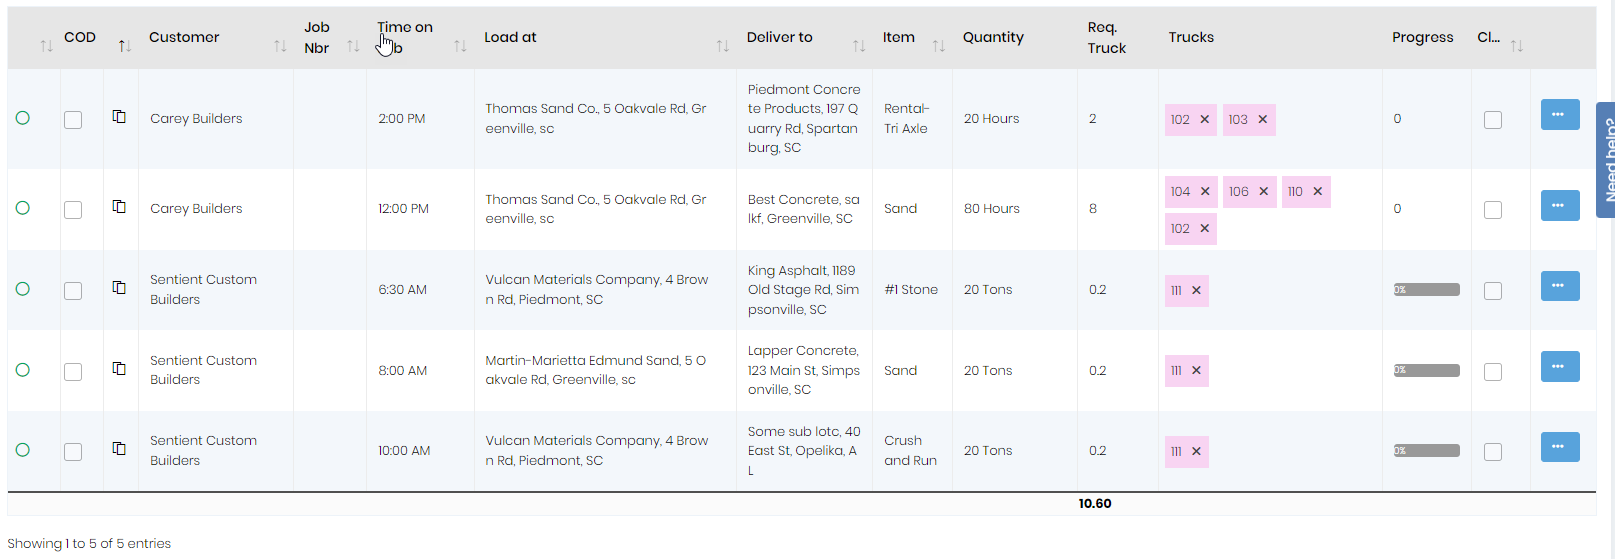
Following is a description of the columns of data being displayed.
You can access menus by
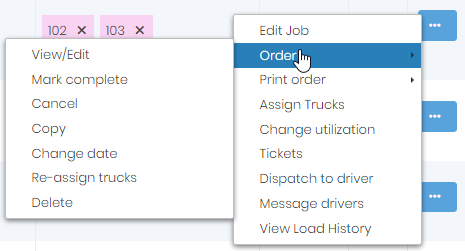
The options on the menu buttons are dynamic. They change in response to the status of the job and trucks assigned to the job. Below are examples of some of the main options you’ll see.
Right clicking on the row anywhere other than over a truck will display a context menu. The menu items on the row context menu look like the below. The menu may be slightly different depending on the status of the job and truck.
These menu items work like the correspondingly named one above except they default to the single truck you right-clicked on instead of all of the trucks on the job.
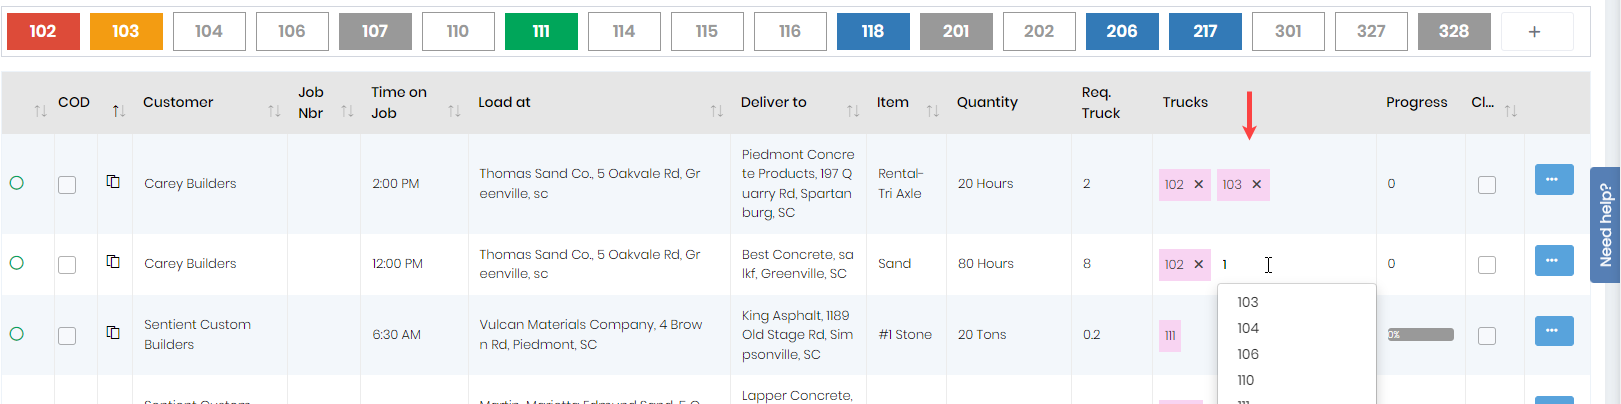
You can directly assign trucks to a job by clicking in the desired row under the “Trucks” column of the schedule. When you start typing, the system will show the trucks matching the truck numbers you have started typing. If you don’t see the desired truck number, it is likely that the truck is out of service, has no driver for this day and shift, or for some other reason is unavailable to be added to this job.
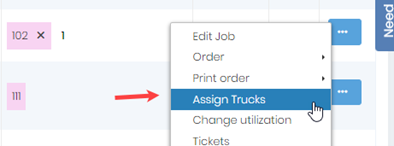
You can also bulk assign trucks to the job using the “Assign trucks” menu item as shown below. The “Assign Trucks” dialog allows you to filter, sort, and bulk select trucks to assign to the job.
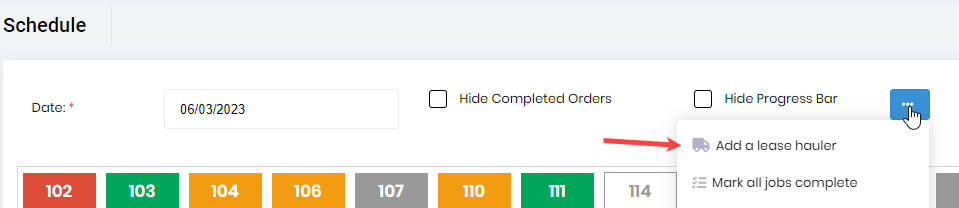
Click the menu button at the top of the menu and select the “Add Lease Hauler” option as shown below.
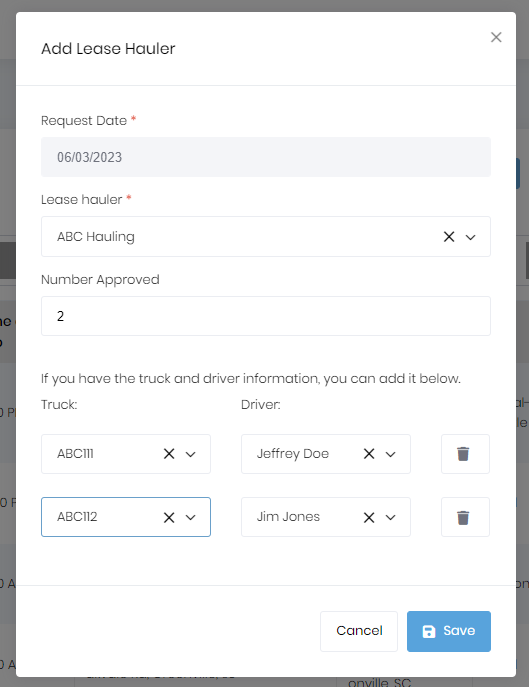
This will display a dialog that lets you choose the lease hauler/subcontractor as shown below. You will specify the lease hauler, number of trucks approved, and then specify the trucks and drivers. These trucks and drivers will be available to be scheduled like your internal drivers. The drivers will also have access to the driver app and can get their dispatches the same as your internal trucks.
Typically, you will want to keep up with the jobs throughout the day and mark them complete when they are done. The hourly jobs will be marked complete automatically once all drivers are clocked out of the job. However, the load-based jobs are not automatically marked complete.
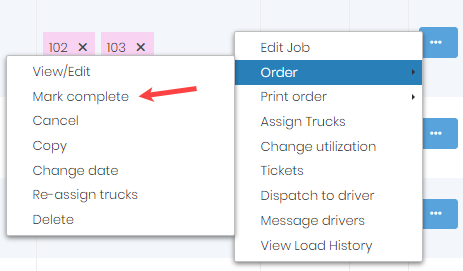
To mark a load-based job complete, you would use the Orders/Mark Complete menu option on the menu button for the job you want to mark complete.
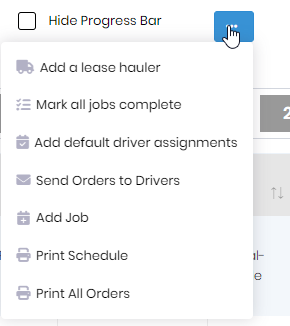
If you have not kept up with marking the jobs complete throughout the day as they are completed, you can review the list and remove or move any jobs you didn’t get to. Then you can close the remaining jobs at once using the “Mark all jobs complete” menu option from the menu button at the top of the schedule as shown below. 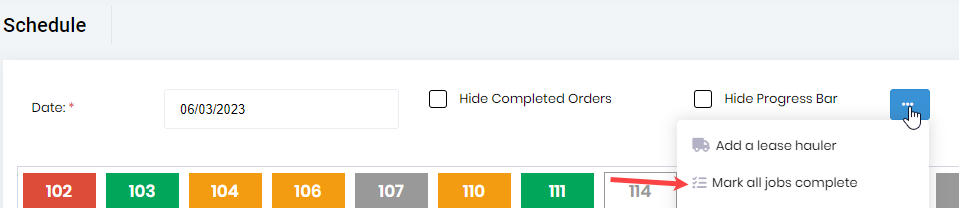
When a truck is assigned to a job on a day, the default driver assignment gets created for that driver, truck, and date and will show on the “Driver Assignment List”. However, the driver assignments will not be created for the trucks that aren’t assigned to jobs for that date. To have these assignments added without assigning a truck to a job, you can click the menu button at the top of the schedule and select the “Add default driver assignments” option from the menu.

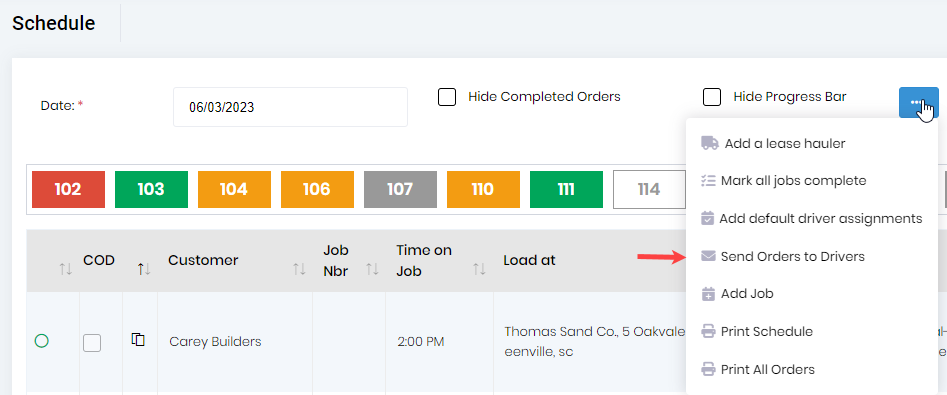
At the end of the day after you have most of your schedule figured out for tomorrow, you’ll want a means for quickly notifying your drivers of their dispatches. If you click the “Send orders to drivers” menu on the menu button at the top of the schedule (as shown below), the dispatches will be created for that date.
When the menu option is chosen, the following dialog is displayed.
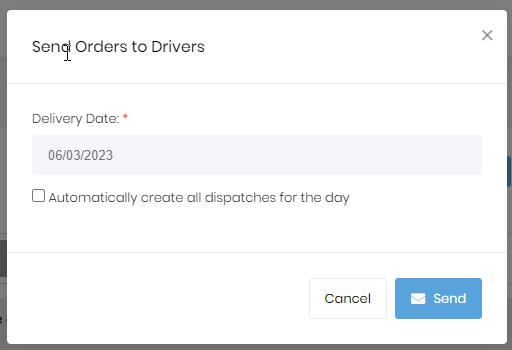
If you check the “Automatically create all dispatches for the day” checkbox, all jobs that have drivers assigned will have their dispatches created. If the checkbox isn’t checked, only the first dispatches of the day will be created.
The dispatches will be created in the order specified by the “Time on job”.
If your settings are to send an SMS or email to the drivers, the SMS or email for the first job of the day will be sent to the driver.
You can add a new job from the schedule by clicking on the menu button at the top of the schedule and clicking the “Add a new job” menu option.
This will display the “Add Job” dialog shown below.
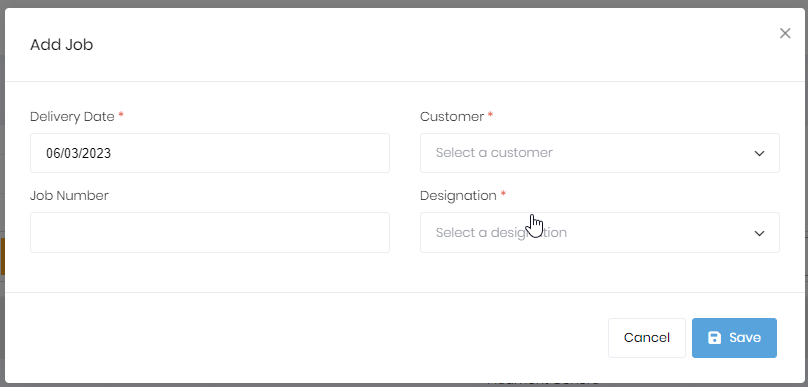
As the controls are filled in, more controls will be displayed.
If you want a printed version of the schedule, you can create one by clicking the “Print Schedule” menu option on the menu button at the top of the schedule as shown below.

When you click the menu option, the “Print options” dialog will be displayed. It will allow you to show or hide the prices. Typically, if you are printing something the drivers will see, you will choose to hide the prices.
If you want to print all work orders for the day, you would select the “Print all orders” menu option from the menu button at the top of the schedule as shown below.
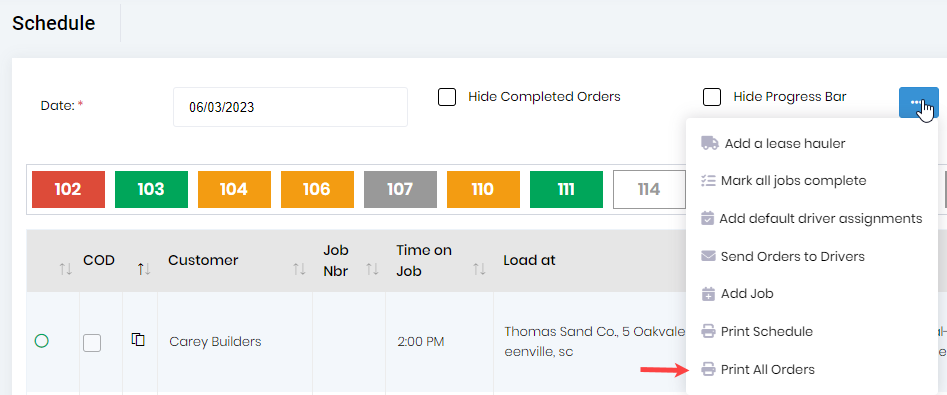
When you click the menu option, the “Print options” dialog will be displayed. It will allow you to show or hide the prices. Typically, if you are printing something the drivers will see, you will choose to hide the prices.
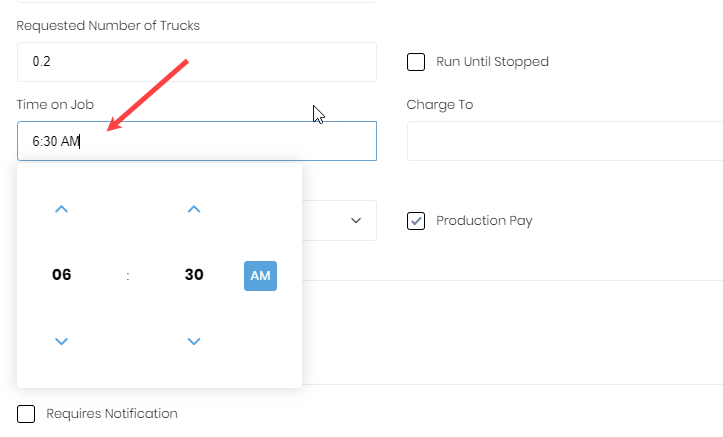
When you click on a job on the schedule in most cells, the “Edit Job” dialog will be displayed with the cursor focus being in the control that you clicked on. For example, if you click on the “Time on Job” for a job as shown below, the “Edit Job” dialog will open with the cursor in the “Time on Job” text box.

The below image shows the “Edit Job” dialog open with the focus on the “Time on Job” control.
You can also open the “Time on Job” dialog for the desired job by clicking the associated menu button as shown below.

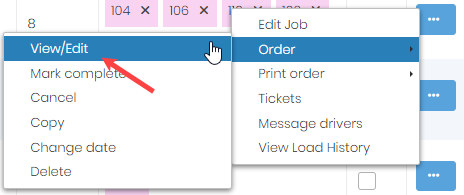
If you know that an order has a single line item, you will typically add or edit the job as mentioned earlier. For multi-line orders, you can edit the order by clicking the “Order”>“View/Edit” menu item from the menu button on one of the jobs on the order as shown below.
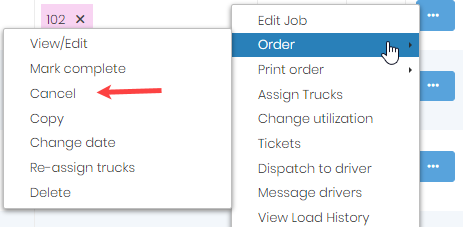
You can cancel a job by clicking on the “Orders”>”Cancel” menu option on the menu button for the job you want to cancel. This cancels the job and removes associated dispatches. The dispatch isn’t removed if it has been started.
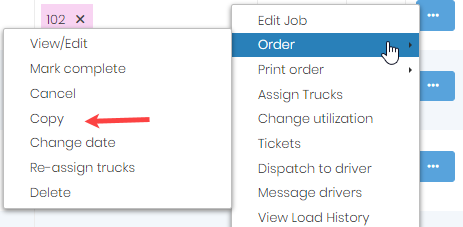
The quickest way to add a job or order is to copy an existing job or order using the “Order”>”Copy” menu item from the menu button of the job you want to copy.
This functionality will copy all order information including rates and notes. It will not copy dispatch or ticket information.
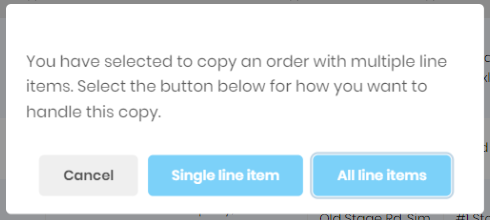
If the job you are copying is part of an order with multiple jobs, you’ll see a dialog like the one below asking if you want to copy a single line item, or all line items associated with the order.
Next you’ll see a dialog where you can set the range of dates you want this order copied to. You can choose a range of up to 7 days.
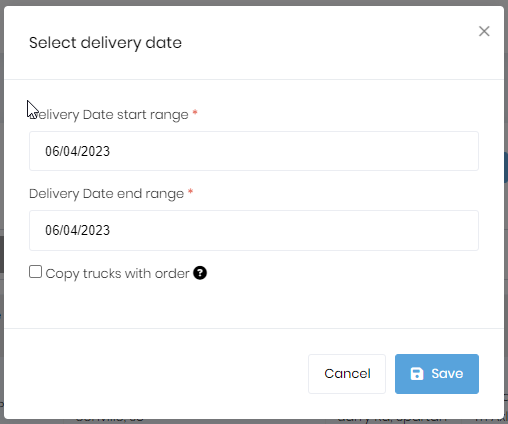
If you want the same trucks to work the jobs, check the “Copy trucks with orders” checkbox.
In the scenario where a customer calls in and tells you that it is too wet to work their job and they need to reschedule, you would select the “Order”>”Change date” menu item from the menu button of the job you want to move to another date. This will display a dialog like the one shown below.
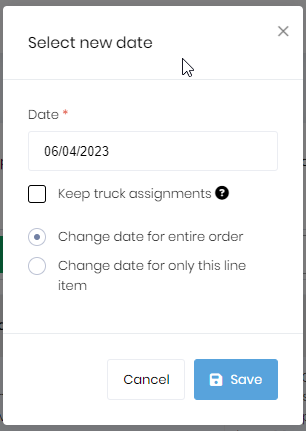
You can select the date, to keep the truck assignments, and if this should apply to this single job or to the entire order.
Upon clicking the “Save” button, the job(s) will be moved to the selected date.
You may have a scenario where you have multiple trucks on the same job when you get a call from the customer of that job telling you they are done with the trucks for the day. If you have another job you want to send these trucks to, you can use the reassign trucks menu option to send them to a new job. This functionality allows you to do this operation in bulk rather than assigning each truck individually to a new job.
It also marks the specified trucks as done on their current job while doing the reassignment.
There may be times that you add a job that needs to be deleted. This isn’t the same as canceling a job. You probably don’t want to delete jobs that are canceled. Deleting should be reserved for jobs that were entered in error and have no associated history.
To delete a job you would select the “Order”>”Delete” menu item from the menu button of the job you want to delete.
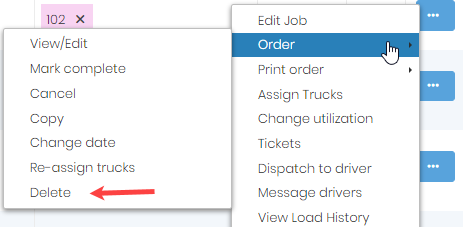
A job can’t be deleted if it has any history such as truck assignments, tickets, etc.. If the only history is a truck assignment, you can remove the truck assignments and then delete the job.
Previously we covered how you can use “Send orders to drivers” to create dispatches based on your schedule. This mas creation of dispatches has limitations due to the rules it follows to create the dispatches.
First, you should only run the “Send orders to drivers” once per day when you have a good portion of your schedule defined for the next day. If you run “Send orders to drivers” multiple times, you will get multiple copies of the dispatches created.
The other limitation is that we only create a single dispatch per truck assignment. For example, if you have an order for 500 tons of #1 stone and assign 5 trucks to the job, we don’t know if you want each truck to do multiple loads until they get to 100 tons each, or if you will be adding more trucks later and only having each truck do a couple of dispatches.
Another option to dispatch is to do it directly from the job on the schedule. When you dispatch this way, you have much more control over the loads dispatched to the trucks.

When you click the “Dispatch to driver” option from the menu button for a job, you’ll see a “Dispatch to driver” dialog as shown below. By default, the “Send to” control will show all of the trucks assigned to the job. You can remove trucks from the list of trucks to dispatch by clicking the “x” on the trucks you don’t want to dispatch.
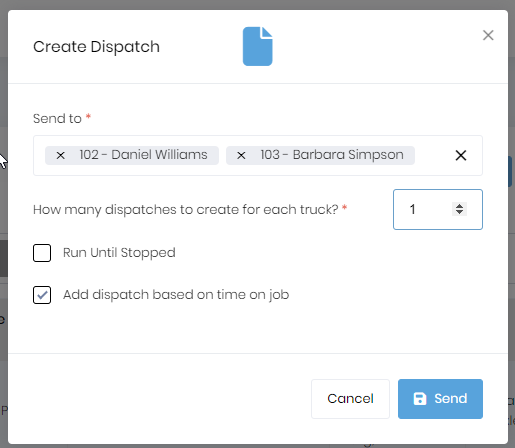
You can adjust the number of dispatches you want to create for each truck by changing the number in the control. If this is a load-based job (other than hourly) and you are sending trucks to a job to do the same dispatches over and over until told to stop, you can check the “Run until stopped” checkbox. When a run until stopped dispatch is created, the system will automatically send a new dispatch for this job every time a dispatch is completed.
The checkbox for “Add dispatch based on time on job” determines if the dispatches are added to the end of the queue on the “Truck Dispatch List” or added based on where the job should be based on the specified time on job.
Messages can be sent to drivers on jobs if they are configured to receive messages. Under the driver’s information, you can specify the preferred method of messaging a driver. It can be via SMS, email, both, or neither.
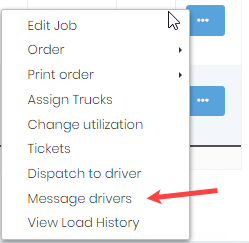
To send messages to all drivers on a job, select the “Message drivers” menu item from the menu button for the job.
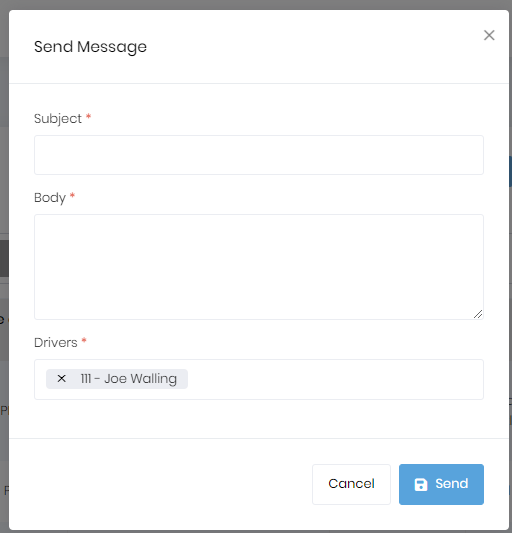
Specify the subject and body. If you don’t want the message to go to all drivers on a job, you can remove the drivers that you don’t want to get the message. When the “Send” button is pressed, the messages in the desired format(s) will be sent.
Truck utilization is calculated based on the portion of a day the truck is scheduled. A utilization of 1 means that the truck is 100% utilized for the day. If you consider a 10-hour day as the norm, each hour will correspond to 10% or a .1 utilization. If you are scheduling a truck for a job that should require 5 hours (a half of a day), you would set the utilization to .5.
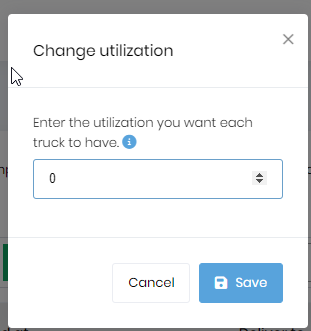
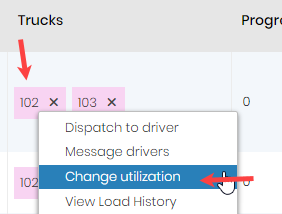
You can set all the trucks on a job to the same utilization by selecting the “Change utilization” menu item on the menu button for the desired job you want to change the utilization for.

In the above example, you can see that there are 2 trucks assigned for the top job. If you want both trucks to be on the job for a half of a day, you could click the “Change utilization” menu item and set the value to .5 on the “Change utilization” dialog shown below.
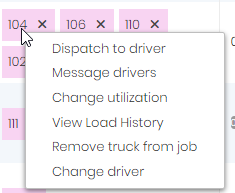
If you want to change the utilization for a single truck on a job with multiple trucks, you can right click the scheduled truck as shown below and select the “Change utilization” menu option.
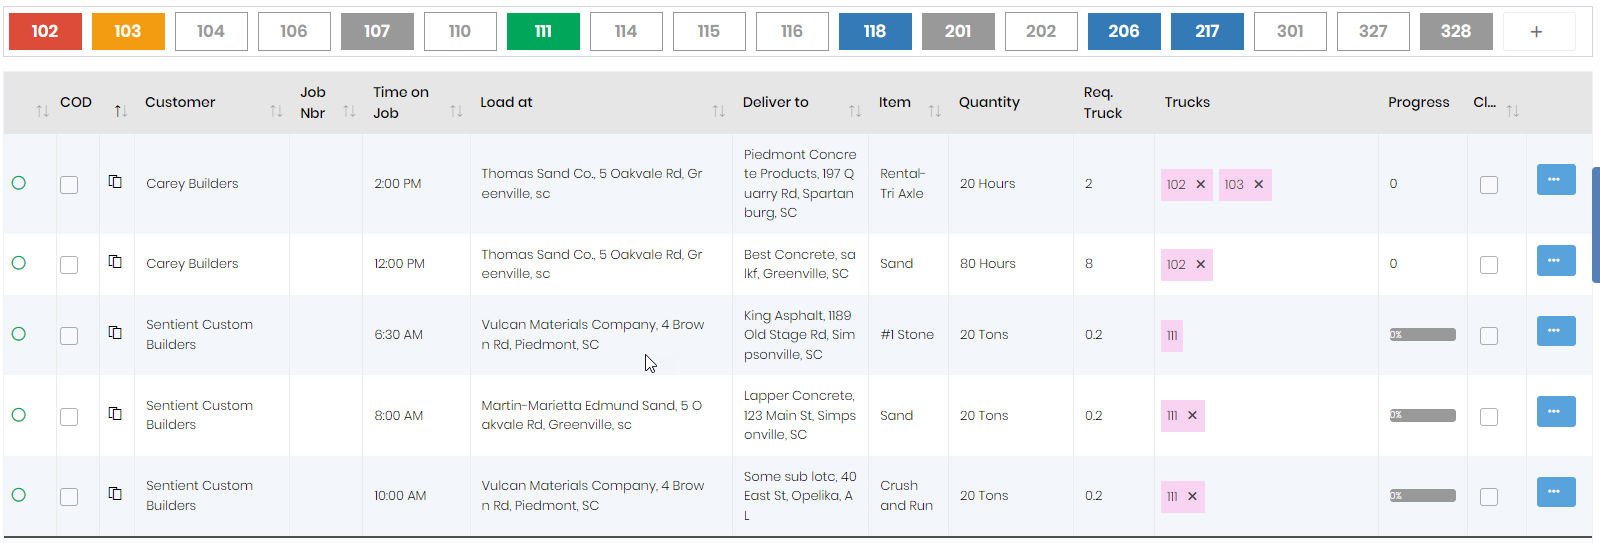
If a truck exceeds a utilization of 1 for the day, it will display in red in the truck block. As you can see in the below image, truck 102 has a utilization greater than 1 (>100%).
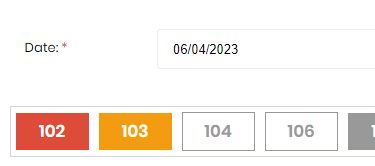
This red truck tells you there may be a problem. If you don’t want to set utilization, you don’t have to. Just know that you’ll have red trucks displayed when a truck is scheduled for more than 1 job.
In the below example, truck 111 has been assigned to 3 jobs, yet is still showing as green in the truck block. That happens because when we set the “Req. Trucks” we set it to .2. This tells the system that the job is only going to take 2 hours or a .2 utilization. Since the total utilization of the 3 jobs works out to .6, you still have 4 hours available to schedule truck 111.
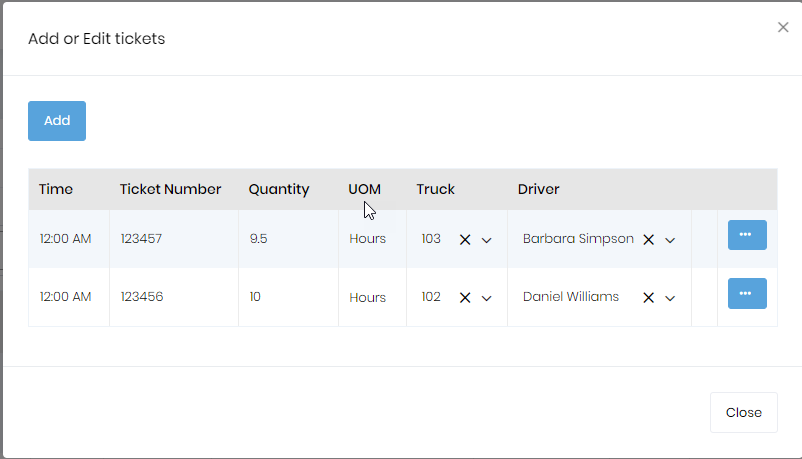
If the tenant is configured to allow associating tickets with orders, there will be a menu item on the job’s menu button that allows adding and editing tickets. When the menu item is selected, you’ll see a dialog like the below.
Please refer to the Managing tickets associated with the orders section for more information related to adding, editing, and billing tickets.
To enable/disable the ticketing, please refer to the documentation on the General tab of the settings page.
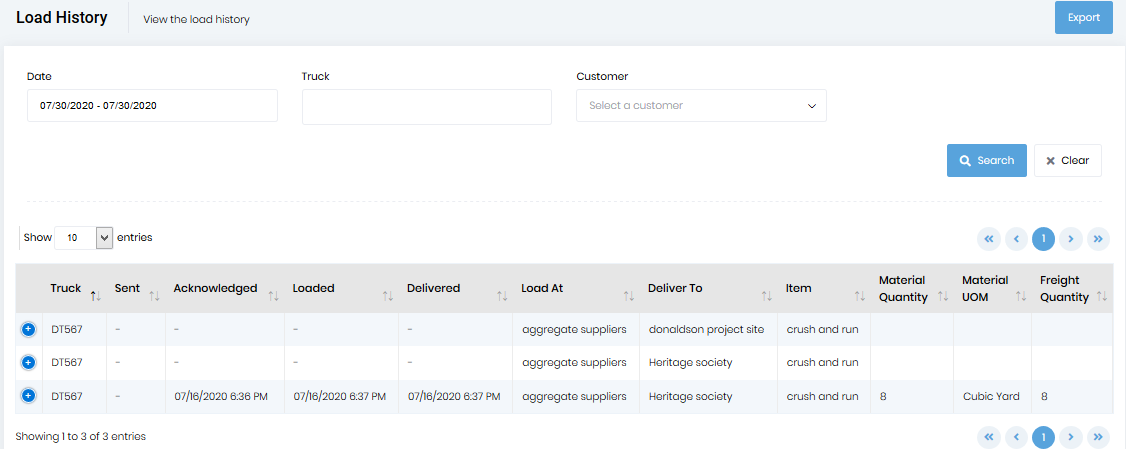
To see all the loads associated with a particular job on the schedule, click on the “View load history” menu. It will take you to the “Load History” page where the dispatches are filtered according to the job you selected.
Click on the “x” on a truck to remove a truck from a job it is assigned to.

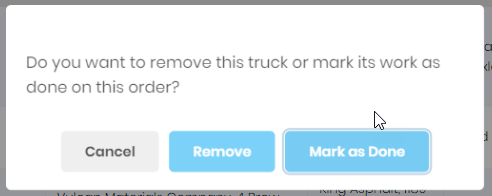
If you are on the schedule for a future date, the truck is automatically removed upon clicking the “x”. You will see the following dialog on clicking the “x” if you are working on the current day’s schedule. Clicking on “Remove” trats the truck assignment as if it had never happened. Clicking on the “Mark as Done” button, retains the history of this assignment.
If you have open dispatches that haven’t been started, you’ll see the below message. The buttons function as described for the message above.

If you have tickets related to a truck assignment, you won’t be allowed to remove the truck assignment. However, you can mark the truck as done on the job, which will remove any future related dispatches.
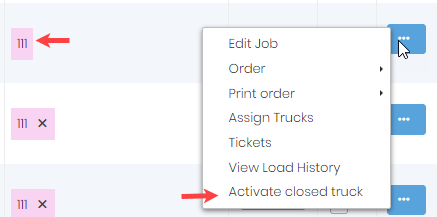
When a truck is marked as done with a job, the truck will be missing the “x” as shown in the below image.

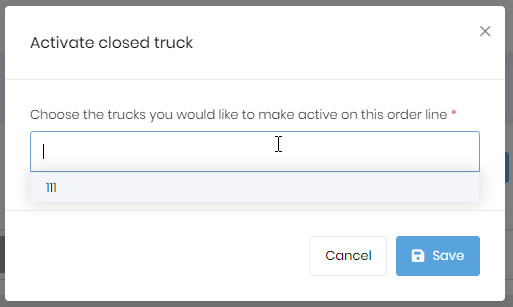
There may be cases where the trucks are removed from a job and later need to be reassigned to the same job. Jobs with inactive trucks will have an “Activate closed truck” menu item on the menu button for the job.
Selecting this menu option will display the following dialog where you can specify the trucks that you want to activate.