Locator allows you to generate links and share the current position of a unit without creating a new user. It would be useful when your client needs to control a delivery for
example.
To find locator, click on the users name on the top right corner and select the appropriate option.

We can roughly divide the whole process of working with the locator into two parts: Creating links and watching them
Lets start with link creation.

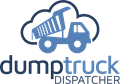
First we need to specify the activation time. We can arrange it for current or future.
Open the calendar and point out the time and the date.

Remember that the activation time cannot exceed 100 days. Then arrange the lifespan of the link 12 hours for example. When the time expires the link will stop working.
You can also put “0” for the lifespan to be unlimited.
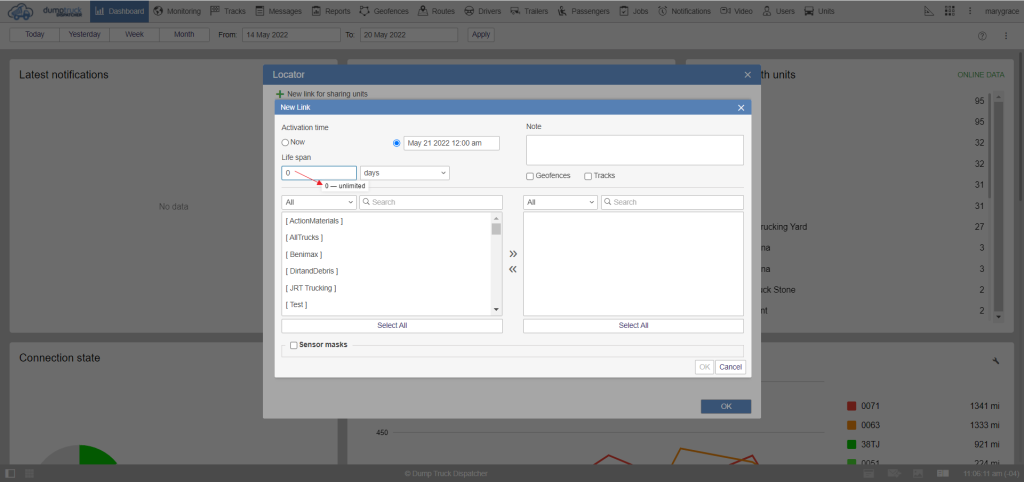
Choose the unit or unit group in which the location you would like to share. Make the process of searching the unit more convenient. Use the drop down menu where you can find the appropriate filter.
By double clicking the item or clicking the arrow on the center, You can move the selected units to the right column.
On the top right side of the window, you can leave a custom note. This note can help you find the link faster in the list.

If you activate the geofences option, the units and also the geofences will be displayed on the map. You can also display tracks the same way, but the route will only be shown since that time when the locator was crated the historical data wont be shown.
On the bottom part of the window you can see the sensor mask activation checkbox, Here you can specify the names or parts of the sensors for which you would like to show their appropriate data.
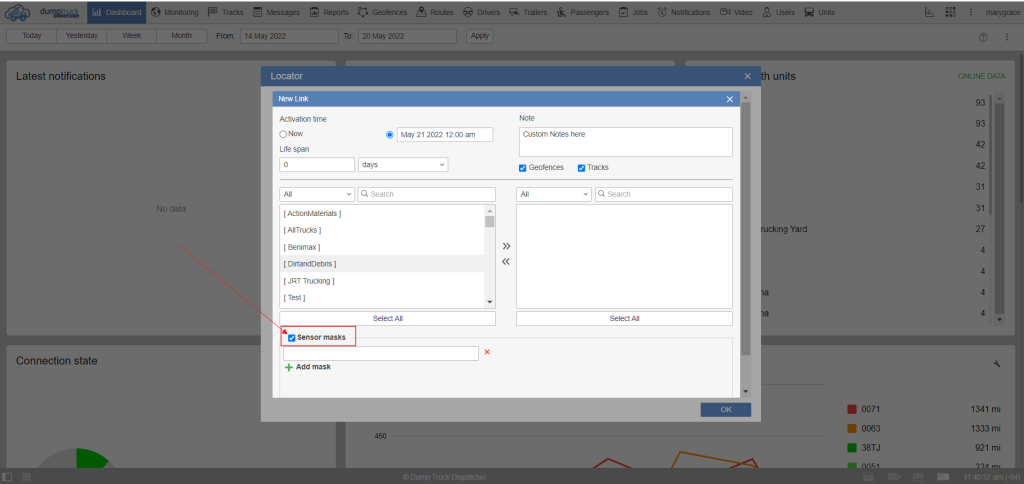
If you would like to display the data of the entire sensors list. Put an asterisk on the box. Click ok to save.
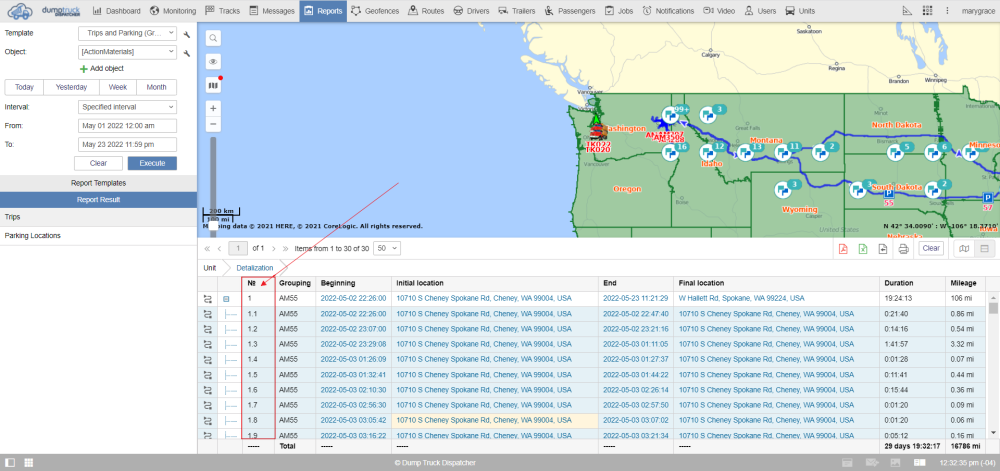
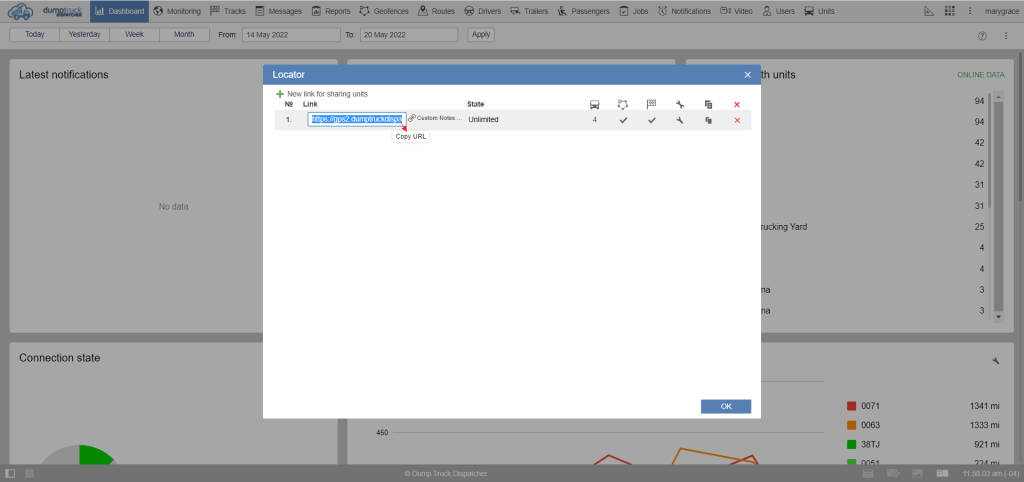
You can find the created link on the list.

You can click the list to open the information in a new tab. You can see the units location, geofences and tracks on the map and the sensors data located on the left side which were specified in the settings of the link.
You can copy the link to share the location of the chosen elements with others.
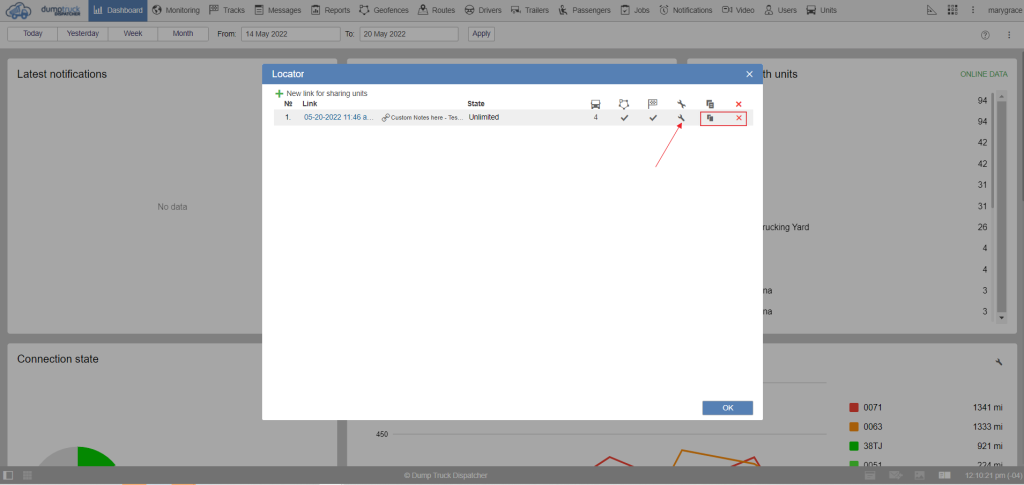
On the right you can find the number of units which are controlled. If you hover over the icon, you can see the list of elements. Next to it you can see if the geofences and tracks are shown on the map.
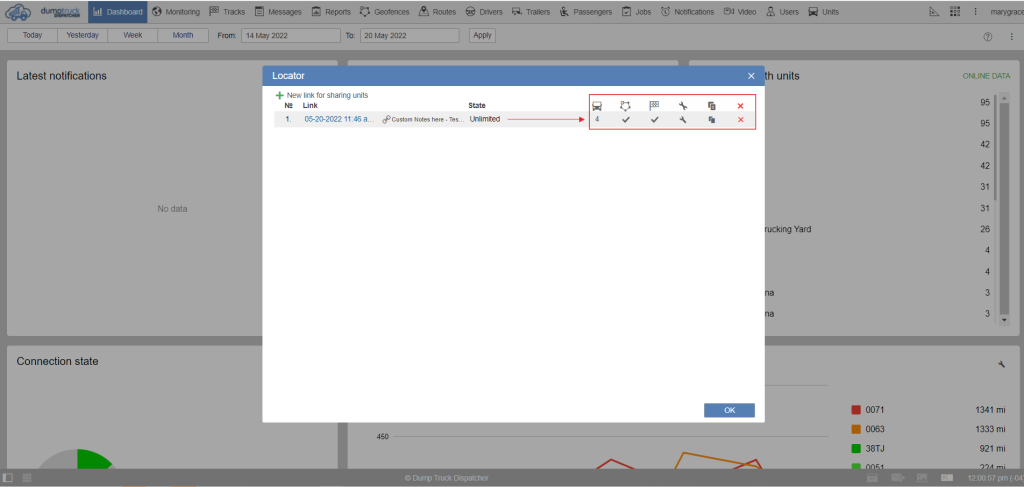
Click on the tool icon to open the links properties and make any changes. You can also copy and delete the link.
Tools are intended for solving different issues like measuring the distance between two dots on the map, Calculating the square of the selected area, making routes,
detecting addresses and location of a unit
Click on three vertical dots icon and activate tools.
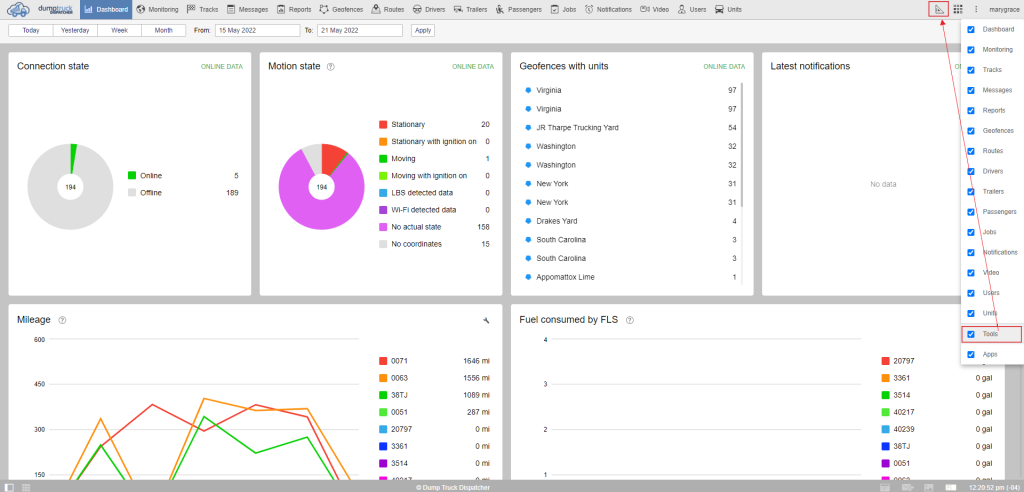
The appropriate icon will be displayed on the top panel of the interface.
The first tool on the list is the track player. It is helpful when different parts of the track overlap and you are not sure which side the unit is moving in a particular moment.
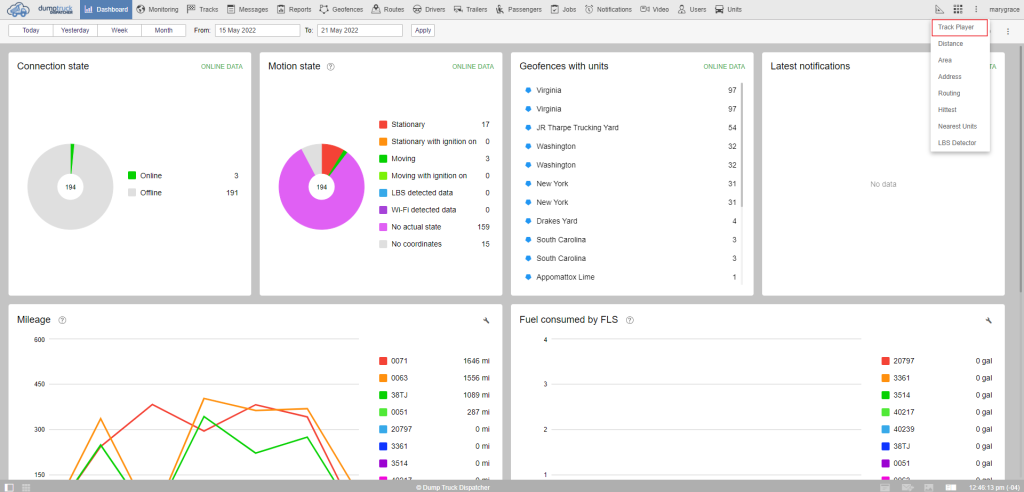
With the help of a track player, its possible to play an already built track with its real or accelerated speed.
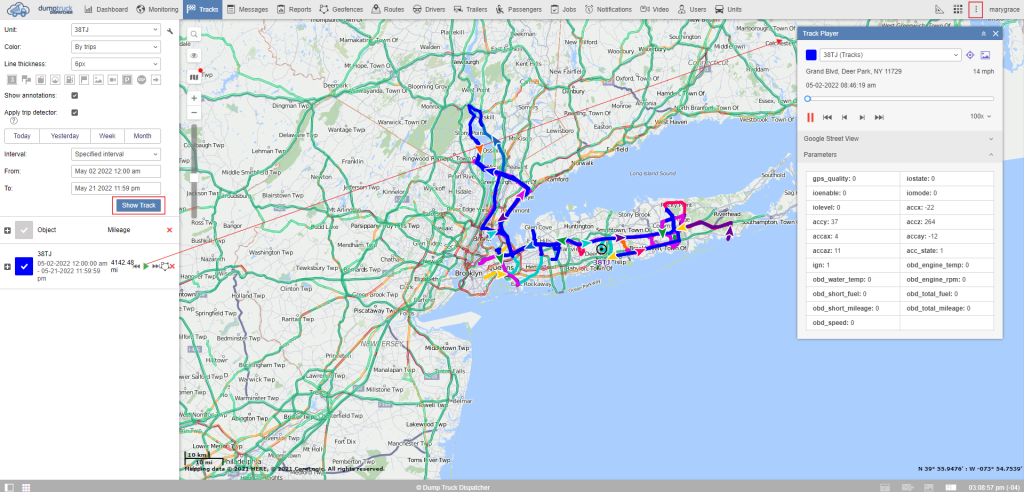
At the top part, you can find the exact address time and date of visiting the selected point and a speed of a unit at t . In the drop down menu at the top you can choose which track you would like
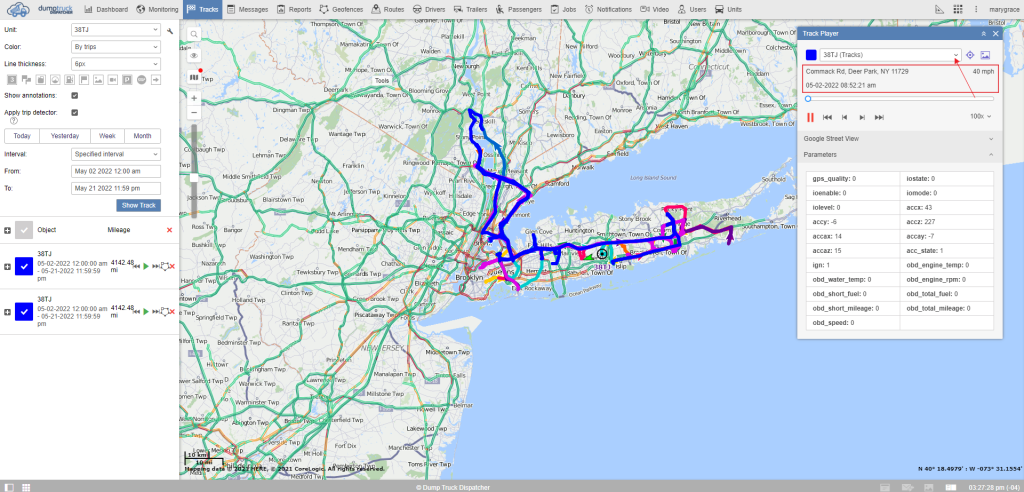
In case you would like the unit to be fixed in the middle of the map during the entire trip, You can activate the Move map while playing option. Click on the images icon
beside it to see the images which the unit can send during the trip. Below, you can find the parameters and sensors data which the trackers send at the specific point.

To play several tracks at the same time, Use the track player web application.

To measure the distance between two points, Use the distance tool. It is useful when the range of coordinates emission. You can set this on the trip detection tab.
You can use this tool to make sure the mileage was calculated correctly.
By double clicking on the map you can place the dots between your initial and final position. To account for turns you can add some extra points, Also you can change the
length of the section by simply pulling one of the points. Look through the information window of the tool to find the result of the calculation.
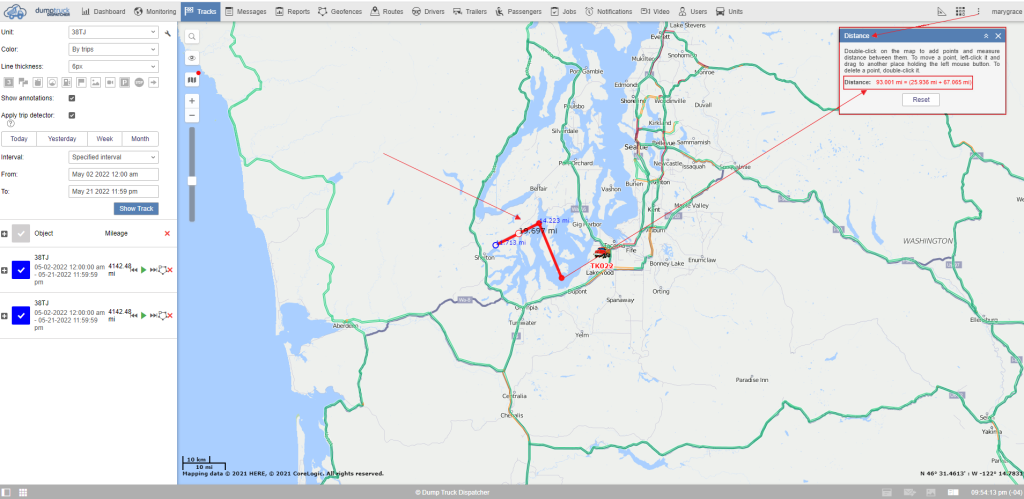
The sum of all segments, which are on the map is the first item and the second item is the distance between the last point .and the cursor. The sum of the two items is
calculated automatically.
To clear the map and reset the calculation, use the reset button.

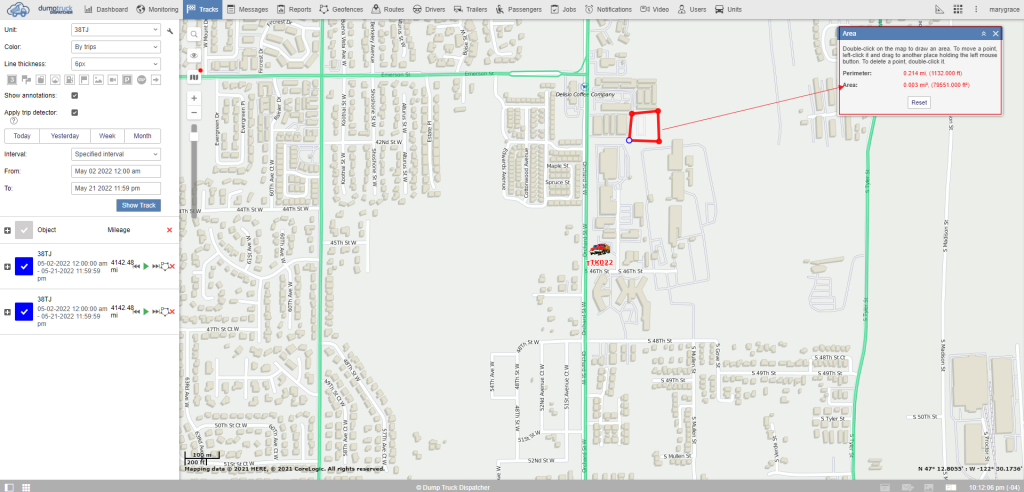
This tool is used to measure the area or perimeter of a zone in the map. It could be a quarry for example. Just like the distance tool double click on the map to place the
points, The lines which connects this points will become the borders pf the measured territory. Similar to creating a polygon geofence. You can still change the shape and
the size of an area by adding new points and moving them on the map.
The result will be shown in the info window located on the top right corner.
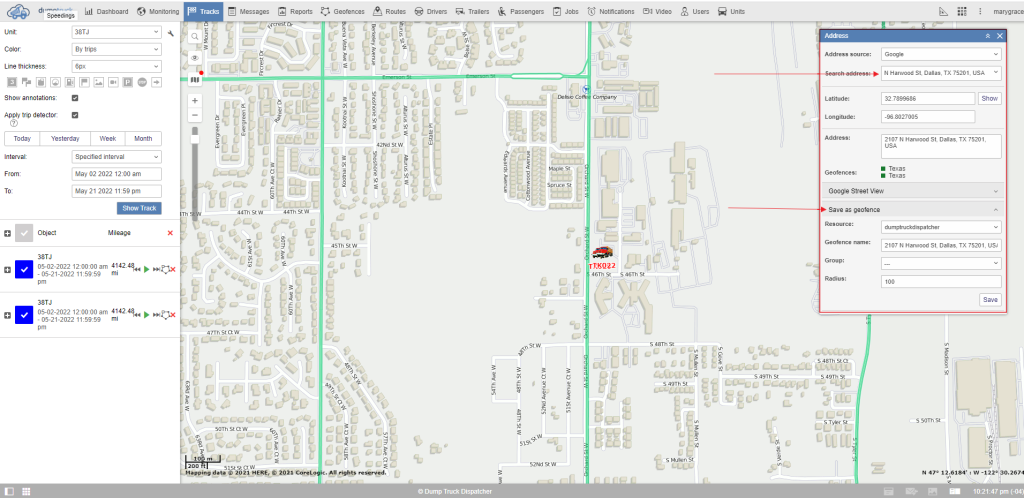
To work with the address tool, You need to select an address source/ the map , then you can enter the address by clicking on the appropriate place on the map or vice versa.
You can find the place on the map by inserting the address or the coordinates.
While typing the address, you’ll be offered a list of several variants according to the inserted data.
The selected position can be saved as a circle geofence with the established radius and the address will be the center of this geofence.
The routing tool allows you to plan the shortest routes from one place to another while visiting several spots in between.

Select the Address Source. You can place the root points in two ways.
The first way is searching points from the address panel. Insert the appropriate address in the location area. To add more points use the same line.
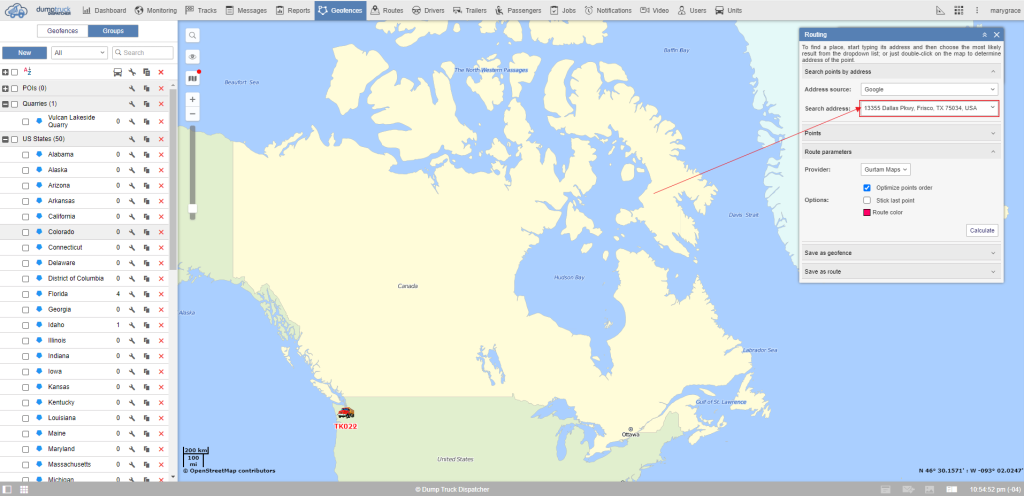
The second way is double clicking on the map and the points panel will open automatically. If you activate the optimize points order option on the route parameters panel, the optimized order of visiting the chosen points will be established including the distance between them.

You can drag up and down the particular point and arrange them in order from start to end point.

You can also choose the color of the route if you want.

To calculate the points order, the length and the duration of the route, press the calculate button on the route parameters.

You can save it as a geofence. Choose the resource where the geofence is supposed to be located. Type its name and add it to a group.

With the help of Save as route panel, You can save the result of the same tab in order to add the schedule and create routes.

This tool is used to quickly acquire about one or more points. Choose the appropriate track to analyze in the dropdown menu. Then select the mode, either single-point or multipoint.

If you move the cursor to a particular point you will see the menu with the information about the point. By double clicking on the track you can move quickly to the closest point.

Using the single point mode in the result window you will see the information about the speed of the unit, the number of the satellites the coordinates of the point and the sensors data.
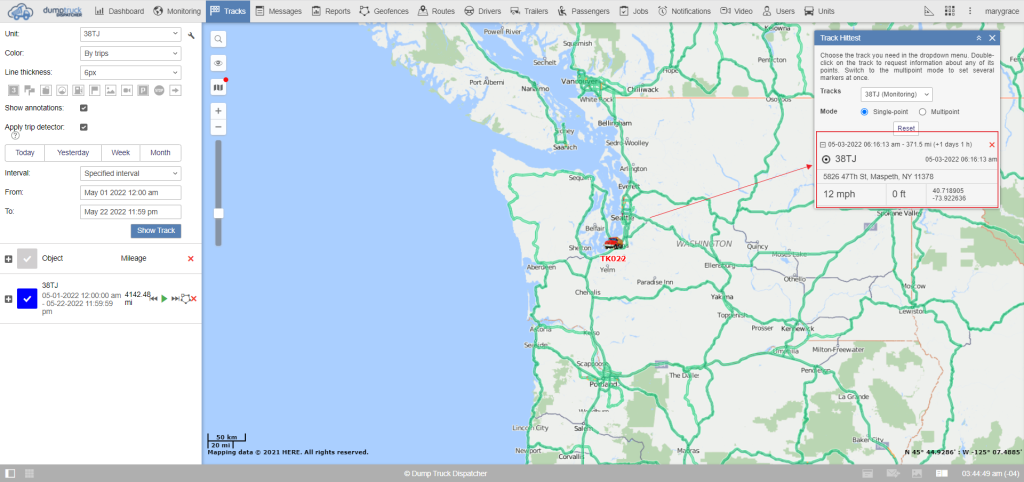
If you select the multi point mode the same information will be displayed but also includes several points.

You can learn which unit is the closest to the selected point with the help of this tool.
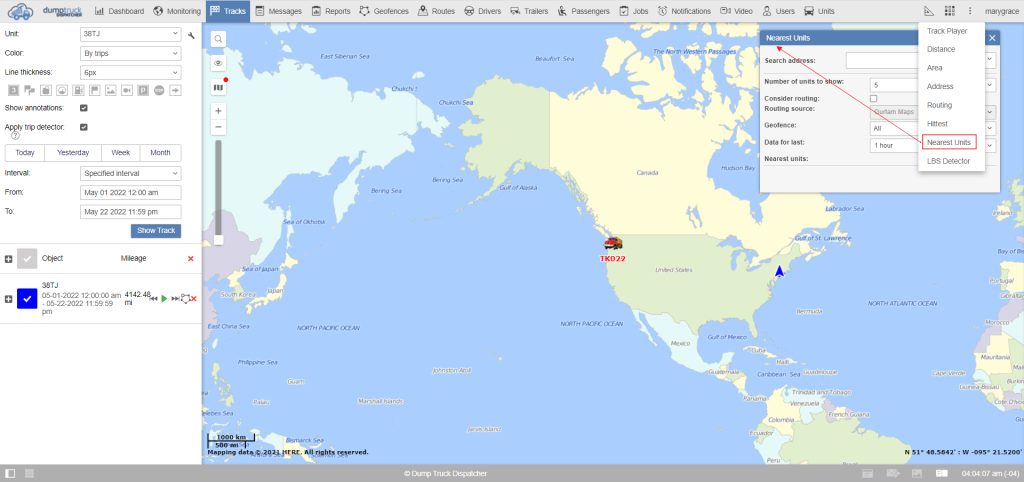
Select the location by double clicking on the map or typing the address to the search address field. Then establish the maximum number of units that are supposed to be shown.
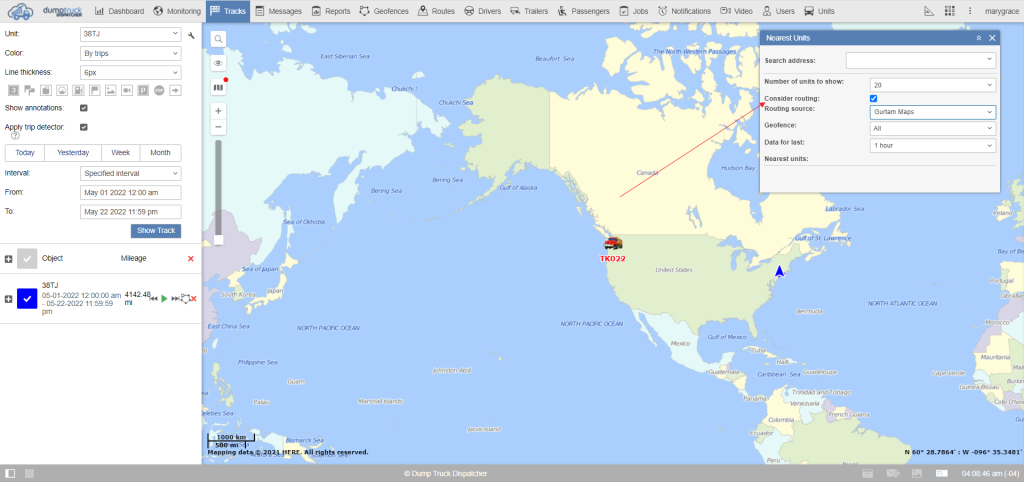
If you're Interested in the distance between the selected position and the unit and also counting the real route , You can activate the consider routing option.
You can choose the routing provider if such option is available on the account.
On the geofence drop down, You can display only the units which are located within the selected geofence.
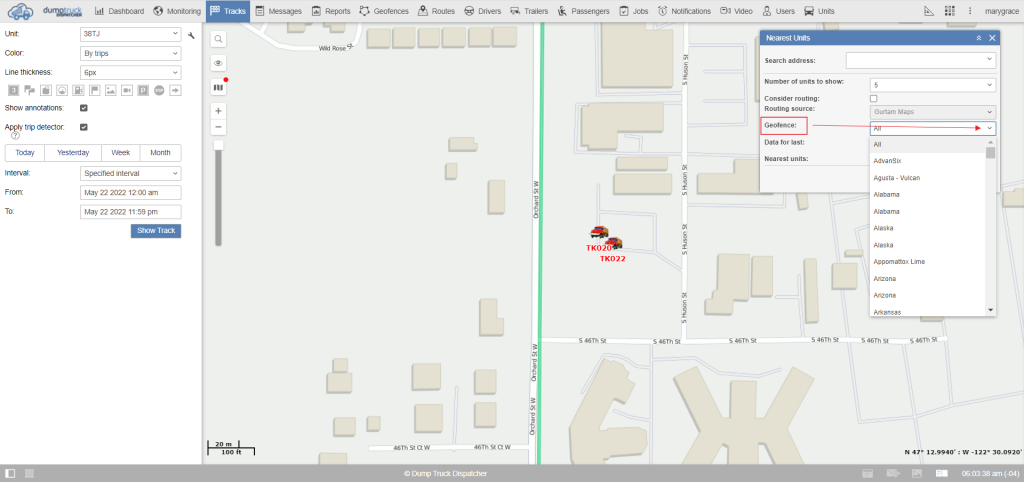
The last filter is the data for last, This will help you to count the relevance of the data and not to display offline units. For example, if you're not interested in units which have not been sending data for the last 6 hours. Type its value in this field.
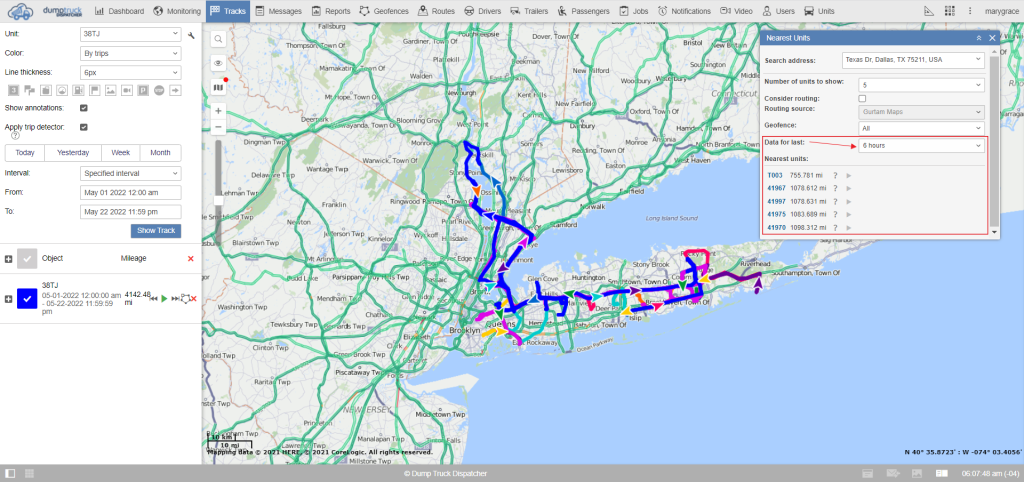
You will see the list of units in the result. Click on the name of the unit and the map will move to this unit.
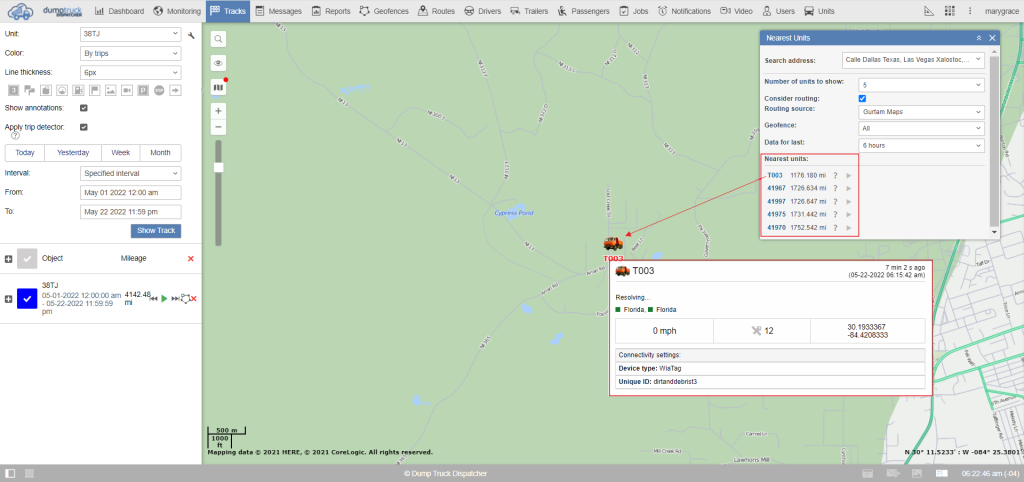
In a closer look You can also see here the drivers phone number. You can also see the distance between the point and the unit and also the time that is supposed to be spent to reach the unit.

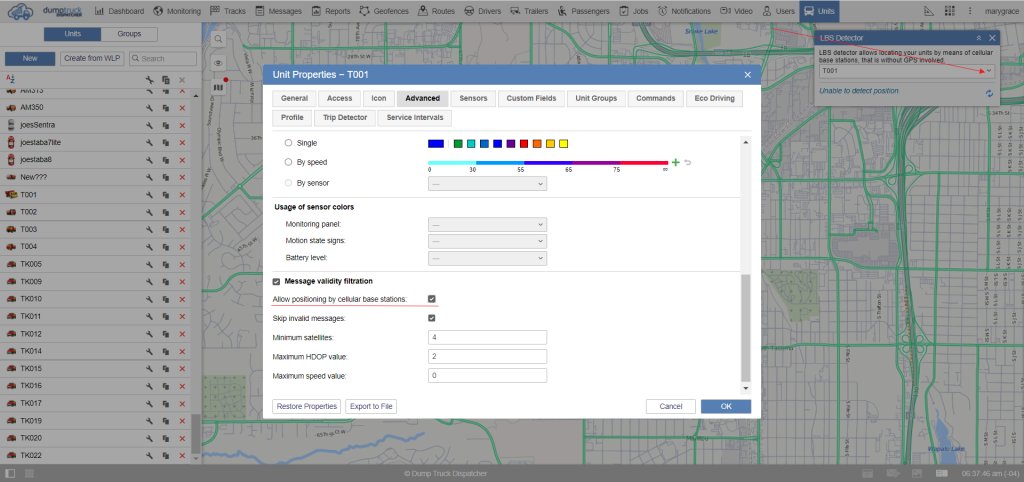
In case the usage of sensor colors option was set on the advance tab of the unit properties, you would see them on this field. In the end of the line, you can find the icon which is for the command sending.

With the help of this tool you can find the approximate loss location of the unit according to the cell tower signal. It is useful when comparing coordinates by GPS in areas with bad satellites capture.
In order to allow positioning by cellular base stations on the advance tab. Back to the tool select the unit in the drop down menu.
Note that the tracker allow the sending of lbs parameters and messages otherwise the unit will not be displayed on the list. Also it is important to have the access rights to query reports of messages for the unit and this unit must be added to the list on the monitoring tab.
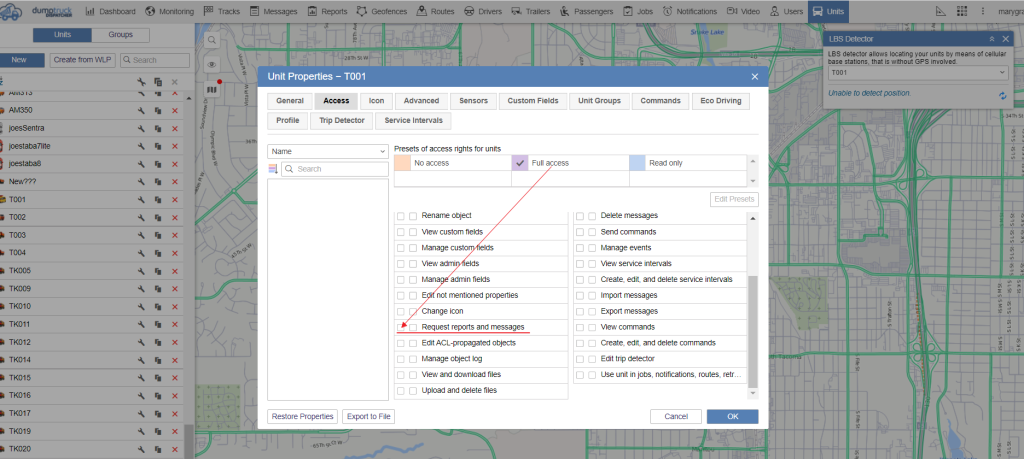
Now you can see the location of the unit according to cell towers.